
The Ultimate Guide to Dental LED Headlights: Enhancing Precision, Comfort, and Care
You’re halfway through a challenging Class II composite restoration. The margins are critical, and the anatomy must be perfect. As you lean in, you subtly tilt your head to catch the operatory light, but your own shadow falls across the prep. You squint, adjusting your posture, feeling the familiar strain in your neck. The light is either too glaring on the occlusal surface or insufficient in the gingival box. For a moment, you’re not just battling caries; you’re battling the light itself.
This scenario is all too common in dental practices still reliant on traditional overhead lighting. Optimal illumination isn’t a luxury in dentistry; it’s the very foundation of clinical excellence. It directly influences diagnostic accuracy, procedural precision, practitioner ergonomics, and, ultimately, patient outcomes. The limitations of conventional lights—harsh shadows, inconsistent intensity, and poor color fidelity—are significant barriers to peak performance.
Enter the dental LED headlight: a transformative piece of technology designed to deliver superior, shadow-free illumination directly into the oral cavity. This guide is crafted from a synthesis of industry specifications, insights from practicing clinicians, and technical analysis of the latest advancements. Our goal is to move beyond marketing claims and provide you with practical, evidence-based information to make a truly informed decision for your practice. We will comprehensively cover the critical role of lighting, the key features and benefits of modern LED systems, a detailed framework for selecting the right model, and essential practices for maintenance, concluding with actionable steps to elevate your clinical care.
Why Lighting is Critical in Modern Dentistry
Before delving into the specifics of LED headlights, it’s essential to understand why lighting is a non-negotiable pillar of modern dental practice. It transcends simply “seeing better”; it’s about seeing accurately and working efficiently while preserving your own physical well-being.
The Impact on Diagnostic Accuracy
The first step in any successful treatment is a correct diagnosis. Inadequate lighting can obscure the subtle details that differentiate health from disease. Proper illumination is crucial for:
* Early Caries Detection: Identifying the faint shadows and opacity of incipient lesions, especially on proximal surfaces.
* Crack and Fracture Identification: Visualizing craze lines in enamel or more profound tooth fractures that dictate treatment plans.
* Plaque and Calculus Assessment: Distinguishing between plaque, materia alba, and stained calculus during prophylaxis and periodontal evaluation.
* Soft Tissue Examination: Accurately assessing the color, texture, and vascularity of gingival and mucosal tissues, which are key indicators of inflammation, infection, or pathology.
This diagnostic precision hinges on a light source with a high Color Rendering Index (CRI), which we will explore later. A light that distorts colors can lead to misdiagnosis or poor shade matching, compromising the standard of care.
Precision and Efficiency in Procedures
Once a diagnosis is made, lighting becomes the engine of procedural execution. Focused, bright, and consistent light translates directly to clinical efficacy.
* Reduced Errors: A clear, shadow-free view of the operative field minimizes the risk of iatrogenic damage to adjacent teeth, over-preparation, or missed caries.
* Improved Speed: When you can see the terminus of a canal, the full extent of a cavity, or the margin of a prep without constant repositioning, procedures flow more smoothly and quickly.
* Enhanced Task Performance: From placing layered composite restorations with precise chroma and value to performing delicate endodontic procedures or suturing, controlled illumination is indispensable. It reduces eye strain and mental fatigue, allowing you to maintain a high level of concentration throughout the day.
Ergonomics and Practitioner Well-being
Dentistry is physically demanding. Chronic poor posture is a leading cause of career-ending neck, back, and shoulder pain among clinicians. Traditional overhead lighting is a major ergonomic culprit.
* The “Crane and Strain”: To avoid casting shadows with your head, you are forced to contort your body to align the patient’s mouth with the operatory light. This results in sustained, non-neutral postures.
* The Headlight Solution: A properly fitted dental LED headlight moves the light source with your vision. Where you look, the light goes. This liberates you from the operatory light, allowing you to maintain an upright, neutral spine position. The reduction in chronic musculoskeletal strain is one of the most significant—and often overlooked—benefits, contributing directly to a longer, healthier career.
Key Features and Benefits of Dental LED Headlights
Modern dental LED headlights are sophisticated instruments. Understanding their core features will help you appreciate their value and differentiate between models.
Superior LED Technology
LEDs (Light Emitting Diodes) have revolutionized dental lighting, offering distinct advantages over older halogen or xenon bulbs:
* Cooler Operation: LEDs emit very little infrared radiation, meaning the light beam is “cool.” This protects patient tissues from thermal stress and increases comfort during long procedures.
* Exceptional Lifespan: With a typical lifespan of 10,000 to 50,000 hours, an LED module can last for a decade or more of clinical use, virtually eliminating the cost and hassle of bulb replacements.
* Consistent Intensity: Unlike halogen bulbs that dim over time, LEDs maintain their rated brightness throughout their lifespan. The light output on day one is the same as on day 3,000.
* Energy Efficiency: LEDs consume a fraction of the power required by halogen systems, leading to longer battery life and reduced energy costs.
Optical Clarity and Beam Quality
The quality of the light is as important as its source. Advanced optics define a premium dental LED headlight.
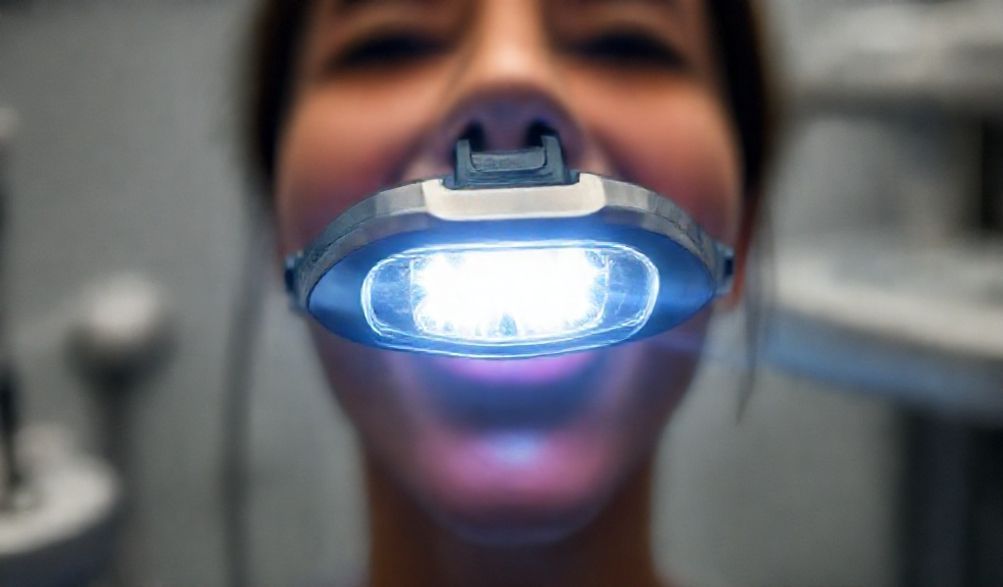
* Shadow-Free Illumination: This is achieved through a ring of LEDs or a specially designed reflector system that surrounds the optical axis. By emitting light from a circle rather than a single point, the shadow cast by your head (or your instruments) is effectively eliminated, filling cavities with even light.
* Adjustable Spot Size & Depth of Field: The ability to change from a wide, diffuse beam for oral exams to a focused, intense spot for deep cavity work adds tremendous versatility. A good depth of field keeps the area in focus even as you move slightly closer or farther away.
* Uniform Light Distribution: The “hot spot” (an overly bright center) common in cheap lights causes glare and eye fatigue. High-quality optics produce a smooth, even field of light with crisp edges.
Comfort and Adjustability
A headlight is only effective if you can wear it comfortably for hours. Design elements are critical.
* Lightweight Design: Modern units weigh between 50-150 grams (without battery), minimizing neck load.
* Balanced Weight Distribution: The center of gravity should be close to the head. Battery packs are often designed to be worn on the waist or clipped to a pocket to counterbalance the front weight.
* Mounting Options: Flexibility is key. Options include adjustable headbands, direct integration with dental loupes (through-the-lens or co-axial mounting), and clips for surgical caps or headwear.
* Easy Adjustability: Knobs or sliders should allow for quick, tool-free adjustments of the light angle and position to achieve perfect alignment with your line of sight.
Color Rendering Index (CRI)
CRI is a measure of a light source’s ability to reveal the true colors of an object compared to natural sunlight (which has a CRI of 100). In dentistry, this is paramount.
* Why High CRI Matters: A low-CRI light can make healthy gingiva appear anemic or mask the subtle color differences between caries and sound dentin. For restorative work, accurate shade matching under a light with a CRI below 90 is nearly impossible, leading to restorations that look perfect in the operatory but mismatched in natural light.
* The Standard: For any clinical dental LED headlight, a CRI of 90 or higher is considered essential. Many premium models now offer a CRI of 95+.
How to Choose the Right Dental LED Headlight for Your Practice
With numerous models on the market, selecting the right one requires a structured evaluation of your needs against the product specifications.
Assessing Your Clinical Needs
Start by asking yourself:
* Specialty & Procedures: An endodontist needs intense, focused light for deep canals. A hygienist may prioritize a wider beam for full-mouth assessments. A restorative dentist needs a balance of both, with exceptional CRI.
* Daily Usage: How many clinical hours per day do you work? This directly impacts battery life requirements.
* Loupe Use: Do you use dental loupes? If so, integration is a top priority.
Technical Specifications to Compare
When comparing models, focus on these key specs:
1. Luminosity (Lux) & Adjustable Intensity: Lux measures illuminance (brightness at a surface). Look for a range suitable for dentistry (e.g., 40,000 to 150,000+ lux at a standard working distance). Crucially, ensure the brightness is adjustable to suit different tasks and avoid glare.
2. Beam Angle and Focus: A variable beam (e.g., switching between a 30° spot and a 80° wide field) offers maximum versatility. Check if the focus is manual or fixed.
3. Battery Life & Charging System: Battery life is rated at a specific intensity. Look for a modern Lithium-ion (Li-ion) battery offering 6-10+ hours at a medium setting. Consider charging time and whether the system offers hot-swappable batteries for uninterrupted use.
4. CRI Rating: Do not compromise. 90+ is the baseline.
5. Weight and Balance: Check the weight of the headpiece itself. A lighter unit (under 100g) is generally preferable for long-term comfort.
Compatibility Considerations
If you wear loupes, compatibility is the most critical factor.
* Through-the-Lens (TTL): The light is mounted on the loupe frame, with the beam path traveling through the lens itself. This offers perfect coaxial alignment (light and vision are on the same axis) but is specific to your loupe brand and model.
* Co-Axial Mounting: The light is mounted above or below the loupe lenses, closely aligned but not directly through them. It offers excellent alignment and is often more adaptable than TTL systems.
* Universal Mounts: Some headbands or clips can be adapted to fit various loupe frames. Always verify with the manufacturers of both your loupes and the intended headlight.
Budget and Value Analysis
Think in terms of Total Cost of Ownership (TCO), not just sticker price.
* Initial Cost vs. Long-Term Value: A higher-priced model with a 10-year LED lifespan, a robust battery, and a good warranty may offer better value than a cheaper unit requiring frequent battery or bulb replacements.
* Reputable Brands: Invest in brands known for reliability, quality optics, and strong customer/technical support. Your headlight is a core piece of clinical equipment; it should be dependable.
* Warranty & Service: A strong warranty (often 2-3 years) reflects the manufacturer’s confidence in their product.
Best Practices for Use and Maintenance
To protect your investment and ensure optimal performance, follow these guidelines.
Optimal Setup and Positioning
- Initial Fitting: Adjust the headband for a snug but comfortable fit. It should not slip but should not cause pressure points.
- Focal Distance: Position the light source so the center of its beam is focused at your typical working distance (e.g., 16-18 inches). This is often set by the mounting bracket on your loupes.
- Beam Alignment: The center of the light beam should be aligned with the center of your visual axis. Look straight ahead at a target and adjust the light until its hotspot is centered in your field of view without you having to tilt your head.
Daily Care and Cleaning
- Headpiece & Cable: Wipe down daily with a disinfectant wipe compatible with plastics and electronics (e.g., 70% isopropyl alcohol wipes). Avoid abrasive cleaners or submerging the unit.
- Battery & Connectors: Keep contacts clean and dry. Check the manufacturer’s instructions for cleaning the battery casing.
- Infection Control: If the headband is not disposable, ensure it is cleaned according to your practice’s infection control protocols.
Maximizing Battery Life
- Follow Charging Instructions: Use only the provided charger. For Li-ion batteries, avoid constantly draining them to 0%. Partial discharges are better than full ones.
- Proper Storage: If storing for extended periods, charge the battery to about 50-60% and store in a cool, dry place.
- Recognize Degradation: All batteries lose capacity over time. If runtime drops significantly (e.g., by 30-40%), it’s time to consider a replacement battery.
Troubleshooting Common Issues
- Dimming/Flickering: Check battery charge first. Ensure all cable connections are secure. If problems persist on a full charge, contact technical support.
- Loose Connections: Inspect cables for kinks or damage. Ensure the connector is fully seated in the headpiece and battery.
- Overheating: LEDs should run cool. If the headpiece becomes hot, turn it off immediately; this could indicate an electrical fault. Contact the manufacturer.
FAQ Section
Q1: How long does a typical dental LED headlight battery last on a single charge?
A: Most modern Li-ion batteries provide between 6 to 10 hours of runtime at a medium intensity setting. Always refer to the manufacturer’s specifications, as runtime is heavily dependent on the brightness level used.
Q2: Can I attach an LED headlight to my existing dental loupes?
A: In most cases, yes. Many brands offer universal mounts or specific adapters designed for popular loupe frames. The key is to verify compatibility directly with the headlight manufacturer or your loupe provider before purchasing.
Q3: What does “shadow-free illumination” really mean?
A: It refers to an optical design where light is emitted from a ring or multiple points around your line of sight, rather than from a single central point. This design fills in the shadow that your head normally creates, providing even, unobstructed light into deep cavities and subgingival areas.
Q4: Is a higher lux rating always better?
A: Not necessarily. While sufficient brightness is crucial (typically 40,000-150,000 lux for dentistry), excessively high, unfocused lux can cause intense glare, reflective “hot spots,” and accelerated eye fatigue. Adjustable intensity and a high-quality, uniform optical system are more important than the maximum lux number alone.
Q5: How often do I need to replace the LED?
A: Very rarely. LED modules have an exceptionally long lifespan, often rated for 10,000 to 50,000 hours—which equates to 10+ years of normal clinical use. They typically outlast the battery system. Replacement is usually only necessary in the event of physical damage.
Conclusion
The transition to a dental LED headlight is more than an equipment upgrade; it’s a fundamental step toward enhancing every facet of clinical practice. As we’ve explored, the benefits are multifaceted: unparalleled diagnostic accuracy through high-CRI, shadow-free light; improved procedural precision and efficiency; and a profound positive impact on practitioner ergonomics and long-term health.
Investing in a quality headlight is an investment in clinical excellence, your personal well-being, and the overall efficiency of your practice. We encourage you to consult with reputable equipment specialists, seek peer recommendations, and, most importantly, request a hands-on demonstration. Experience the difference of true, personal illumination.
Ultimately, the modern dental LED headlight is not just a tool you use; it is an integral component of a patient-centered, technologically advanced, and sustainable practice. It empowers you to see clearly, work precisely, and care for your patients—and yourself—at the highest level. Evaluate your current lighting solution today and take the step to illuminate your work like never before.
p>