
The Ultimate Guide to Dentist Lamps: Illuminating Precision in Modern Dentistry
What’s the single most important tool for a dentist after their skill? While high-speed handpieces, digital scanners, and biocompatible materials often steal the spotlight, there’s a fundamental element that underpins every single procedure: light. Without optimal illumination, even the most skilled hands are working at a disadvantage. The humble dentist lamp, or dental operatory light, is the unsung hero of the modern practice, transforming a simple beam into a critical instrument for precision, accuracy, and care.
The problem of poor lighting in dentistry is more than just an inconvenience. It manifests as persistent eye strain and fatigue for the clinician, leading to long-term occupational health issues. It can cause diagnostic oversights—a hidden caries lesion, a subtle crack in enamel, or a variation in tissue health can easily be missed. Procedurally, it slows down work, increases the potential for errors during delicate restorations or root canals, and can even contribute to patient discomfort from excessive heat or glare.
The solution lies in understanding that today’s dentist lamp is a feat of engineering. It is no longer a simple bulb on an arm but a sophisticated, ergonomic instrument designed specifically to conquer these challenges. This guide will illuminate the path to choosing and using the right light, ensuring your practice shines.
This guide is built on a foundation of E-E-A-T (Experience, Expertise, Authoritativeness, Trustworthiness):
* Experience: We synthesize insights from extensive reviews of dental equipment, direct feedback from practicing clinicians, and real-world clinical requirements.
* Expertise: The information is grounded in the technical specifications that matter—color temperature, shadow reduction, lux output—as defined by dental practice standards and ergonomic research.
* Authoritativeness: Our recommendations align with the principles and guidelines suggested by leading dental associations and clinical equipment evaluators.
* Trustworthiness: Our goal is to provide balanced, practical, and clear information to help you, the dental professional, make confident, informed decisions for your practice and patients.
Why Dental Lighting is Non-Negotiable for Patient Care & Practice Success
A dentist lamp is not a mere accessory; it is a primary diagnostic and operative tool. Its quality directly correlates with the quality of care you provide and the long-term health of your practice.
The Direct Impact on Diagnostic Accuracy
The first step in any treatment is accurate diagnosis, and this is entirely dependent on visibility. A high-quality light with excellent color rendering and appropriate intensity is crucial for:
* Caries Detection: Differentiating between stained fissures and active decay, or spotting the subtle shadow of an interproximal lesion, requires light that reveals true color and detail.
* Crack Identification: Identifying craze lines versus potentially symptomatic tooth cracks demands shadow-free, focused illumination to highlight minute structural defects.
* Tissue Assessment: Evaluating gingival health, detecting oral lesions, and assessing mucosal color for signs of pathology rely on light that does not distort tissue tones. Poor lighting can mask inflammation or other critical signs.
Enhancing Procedural Precision and Efficiency
Once a diagnosis is made, the procedure’s success hinges on precision. A superior dentist lamp acts as a surgical-grade spotlight for the oral cavity.
* Error Reduction: In procedures like composite restorations, precise margins are everything. Shadow-free, bright light ensures you see the exact interface between tooth and material, reducing the need for adjustments and remakes.
* Speed and Workflow: Fumbling to position a dim or poorly articulated light wastes valuable chair time. A responsive, easily maneuverable light allows you to maintain focus and rhythm, leading to more efficient procedures and a better patient experience.
* Specialized Clarity: For endodontics, locating canal orifices in the dark chamber of a pulp floor is exponentially easier with intense, shadow-reduced light. In surgery, it illuminates the field for clean incisions and controlled hemostasis.
Protecting Practitioner Health: Combating Eye Strain and Fatigue
The ergonomic cost of poor lighting is a silent epidemic in dentistry. Squinting, leaning into shadows, and straining to see detail under inconsistent light leads to:
* Visual Fatigue: Headaches, blurred vision, and dry eyes.
* Musculoskeletal Strain: Compensatory poor posture to “get a better look” exacerbates neck, shoulder, and back problems.
* Long-Term Occupational Risk: Chronic eye strain can contribute to premature presbyopia and other vision issues.
A properly positioned, high-quality dentist lamp delivers consistent, comfortable light directly into the oral cavity, allowing you to maintain a neutral posture and reducing the intense focal strain on your eyes throughout the day. It’s a critical investment in your own career longevity.
Key Features to Evaluate When Choosing a Dentist Lamp
Navigating the specifications of a dentist lamp can be daunting. Focus on these core features to make an intelligent comparison.
Light Quality Metrics: Lux, CRI, and Color Temperature
- Lux (Illuminance): This measures the amount of light falling on a surface. For dental procedures, the recommended illuminance at the operative field is typically between 20,000 to 40,000 lux. Insufficient lux forces you to work in the dark; excessive lux can cause glare and patient discomfort.
- CRI (Color Rendering Index): Rated on a scale of 0-100, CRI indicates how accurately a light source reveals the true colors of objects compared to natural daylight. For dentistry, a CRI of 90 or above is essential. This is non-negotiable for shade matching in cosmetic work and accurate tissue assessment.
- Color Temperature (Kelvin, K): This describes the “warmth” or “coolness” of light. Warm light (<4000K) is yellowish, while cool light (>5000K) is bluish. The ideal range for dentistry is 5500K to 6500K, known as “daylight white.” This neutral, bright light maximizes contrast, reduces eye fatigue, and provides the most accurate color perception.
Advanced Illumination Technology: LED vs. Halogen
The battle is decisively over: LED is the modern standard.
* LED (Light Emitting Diode):
* Pros: Runs extremely cool, eliminating patient discomfort from radiant heat. Highly energy-efficient (uses ~80% less power than halogen). Exceptionally long lifespan (50,000+ hours). Instantly reaches full brightness. Offers perfect daylight color temperature (5500-6500K) and high CRI.
* Cons: Higher initial purchase price (offset by long-term savings).
* Halogen:
* Pros: Lower upfront cost. Provides a warm, continuous spectrum of light.
* Cons: Generates significant heat. Inefficient and costly to run. Short bulb lifespan (1,000-2,000 hours). Color temperature tends to be warmer (~3500K), which can distort color perception.
Recommendation: For any new purchase or upgrade, choose LED. The total cost of ownership and clinical benefits are overwhelmingly superior.
Ergonomic Design and Maneuverability
A light must go where you need it, when you need it, without a fight.
* Reach & Articulation: The arm should have a wide range of motion to comfortably cover all quadrants for both right and left-handed clinicians, whether seated or standing.
* Balance & Stability: The light should stay firmly in position once placed, without drifting or sagging. Counterbalanced arms are key.
* Infection Control: Look for smooth, sealed housings and touchless controls (footswitch, voice control, or motion sensor) or at the very least, large, easy-to-clean buttons. Handles should be designed for easy wiping with disinfectants.
Shadow Reduction and Field of View
The oral cavity is a cave full of obstacles (lips, cheeks, tongue, hands). A good dentist lamp is designed to penetrate it.
* Multi-Point Light Source: The most effective technology uses multiple LEDs (often 3 or more) arranged in a ring or cluster. By projecting light from several slightly different angles, shadows cast by instruments or fingers are dramatically reduced or even eliminated.
* Field Diameter: The light should provide a wide, even field of illumination (typically 80-120mm at a standard working distance) to cover the entire operative site without constant repositioning.
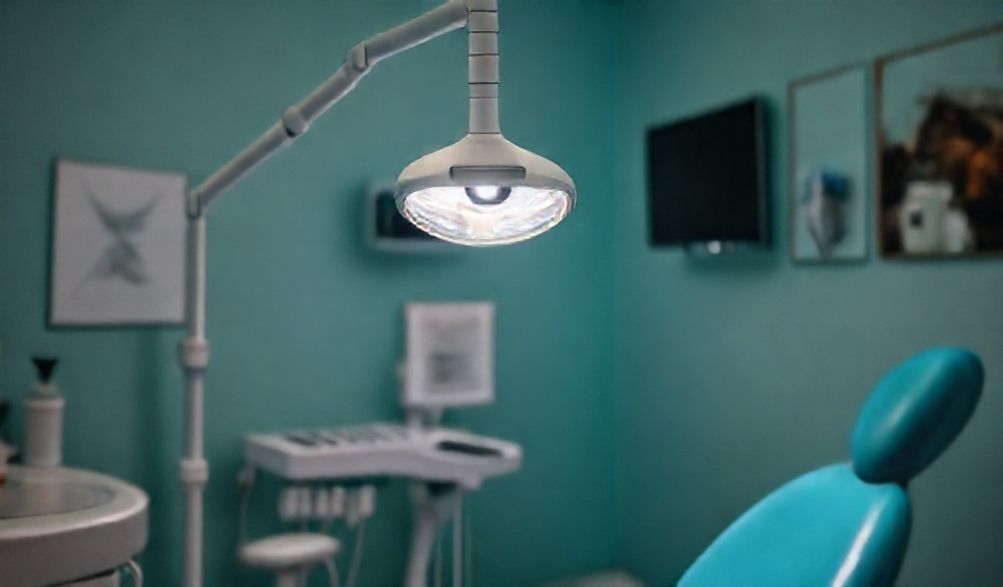
Types of Dental Operatory Lights and Their Best Uses
Chair-Mounted Lights: The Traditional Workhorse
- Pros: Integrated directly into the dental chair, ensuring stability and a unified look. Often more affordable and simpler to install. Movement is directly linked to the chair’s position.
- Cons: Positioning can be limited by the chair’s design. It can take up space on the chair arm and may interfere with assistant positioning. The light’s range is tied to the chair’s location.
- Best For: General dentistry practices, especially in compact operatories or as a reliable, cost-effective standard.
Ceiling-Mounted Lights: Maximizing Space and Flexibility
- Pros: Offers the greatest range of motion and positioning freedom, completely independent of the chair. Frees up floor and chair space, creating a cleaner, more modern operatory. Ideal for four-handed dentistry and surgical procedures where optimal positioning is critical.
- Cons: Higher initial cost and requires professional installation, including structural ceiling support.
- Best For: Modern, spacious operatories, surgical specialties (oral surgery, periodontics), and practices prioritizing maximum ergonomic flexibility.
Wall-Mounted and Portable Options
- Wall-Mounted: A space-saving alternative to ceiling mounts, offering good range of motion. Useful in rooms where ceiling mounting isn’t feasible.
- Portable examination lights: Small, handheld or on a stand. Excellent for extraoral examinations, consultations, emergency triage, or as a supplementary light source in hygiene bays.
Installation, Maintenance, and Safety Best Practices
Professional Installation Considerations
Especially for ceiling-mounted units, never attempt a DIY installation. It involves:
* Structural Assessment: Ensuring the ceiling can support the weight of the light and arm, both static and in motion.
* Electrical Work: Proper wiring to a dedicated circuit, often requiring an electrician.
* Calibration: Ensuring the counterbalance is correctly set for smooth, stable movement. Always use a manufacturer-certified or highly recommended dental equipment installer.
Routine Cleaning and Disinfection Protocol
The dentist lamp is a high-touch surface. A strict protocol is mandatory:
1. After Each Patient: Use an intermediate-level, hospital-grade disinfectant wipe on all touch surfaces—the handle, control buttons, and any part of the arm frequently touched.
2. Daily/Weekly: Gently wipe down the entire housing and arm to remove dust. Never spray disinfectant directly onto the light head. Always follow the manufacturer’s instructions for cleaning the lens to avoid damaging anti-glare coatings.
3. Use Barriers: Consider disposable plastic barriers for handles, but remember: barriers do not replace cleaning and disinfection between patients.
Troubleshooting Common Issues
- Dimming or Flickering (LED): Usually indicates a power supply issue. Check connections. If persistent, contact technical support.
- Light Not Turning On: Verify the power connection and footswitch/control panel. For halogen lights, check the bulb.
- Stiff or Drifting Movement: The arm’s joints may need lubrication (use only manufacturer-recommended lubricant) or the counterbalance system may need recalibration by a technician.
- Rule of Thumb: For any electrical issue or internal mechanical problem, contact a qualified service technician. Do not open the light housing yourself.
Investing Wisely: Cost vs. Value in Dental Lighting
Understanding the Price Spectrum
A basic chair-mounted halogen light may cost a few hundred dollars. A premium, ceiling-mounted LED light with touchless controls can cost several thousand. The price is driven by:
* Technology: LED commands a premium over halogen.
* Features: Touchless controls, advanced shadow reduction, and premium materials increase cost.
* Brand & Support: Established brands with robust warranties and service networks often cost more.
* Mounting Type: Ceiling mounts are more expensive than chair mounts due to complexity.
Total Cost of Ownership (TCO)
Look beyond the sticker price:
1. Energy Consumption: An LED light uses a fraction of the electricity of a halogen.
2. Bulb Replacement: Halogen bulbs need frequent, costly replacement. LED modules are designed to last for over a decade of clinical use.
3. Service & Downtime: A more reliable, well-built light reduces costly downtime and repair bills.
Questions to Ask Before You Buy
- What is the warranty period and what does it cover?
- Is local service and technical support readily available?
- Is this light compatible with my existing dental chair (if chair-mounting)?
- Are replacement parts (handles, control panels) easily obtainable in 5-10 years?
- Can I get a live demonstration or trial in my operatory?
FAQ Section
Q1: What is the ideal color temperature for a dentist lamp?
A: A color temperature between 5500K and 6500K (daylight white) is generally recommended as it provides excellent contrast for detail work, reduces eye fatigue, and does not distort the true color of teeth and soft tissues.
Q2: How often should I replace my dental operatory light?
A: LED lamps have a lifespan of 50,000 hours or more. For a typical practice, this means 15-20 years of use. Replacement is usually due to mechanical wear or a desire to upgrade features, not light failure. Halogen bulbs need replacing every 1,000-2,000 hours (approximately every 6-12 months).
Q3: Can I install a ceiling-mounted light in my existing operatory?
A: Yes, but it requires planning. You must have a structural assessment of your ceiling to ensure it can support the load, run appropriate electrical wiring, and hire a professional installer. Always consult with both the light manufacturer and a qualified contractor.
Q4: Are there specific lights recommended for dental specialties?
A: Yes. Oral surgeons often prefer high-intensity, ceiling-mounted lights for maximum field illumination and positioning flexibility. Endodontists benefit most from lights with exceptional shadow reduction to see deep into pulp chambers. Cosmetic dentists must prioritize lights with a very high CRI (95+) for accurate shade matching.
Q5: How do I properly clean my dental light to maintain infection control?
A: After each patient, use a hospital-grade disinfectant wipe on all touch surfaces (handles, control buttons). Clean the housing and lens regularly according to the manufacturer’s instructions—typically with a soft, damp cloth. Never spray cleaner directly onto the light head, as fluid can seep in and cause damage.
Conclusion
Your dentist lamp is far more than a utility; it is a foundational pillar of clinical excellence. It is an investment that pays dividends in diagnostic confidence, procedural precision, practitioner well-being, and overall practice efficiency. Choosing the right light is a decision that impacts every patient interaction and the long-term health of your career.
When evaluating options, prioritize LED technology for its cool operation, efficiency, and longevity. Do not compromise on ergonomic design and adequate intensity tailored to your specialty. The upfront cost of a superior light is quickly justified by its performance, reliability, and the tangible improvement in your daily work life.
This guide was created to provide you with trustworthy, expert-backed information to navigate this crucial decision. We encourage you to audit the lighting in your operatories today. Is it helping or hindering you? The next step is to consult with a reputable dental equipment supplier to see demonstrations of different models in action. Illuminate your practice with precision, and see the difference it makes.
p>