
The Ultimate Guide to Wall Mounted Examination Lights: Selection, Benefits & Installation
For medical, dental, and veterinary professionals, the difference between a confident diagnosis and an uncertain one often comes down to one critical factor: visibility. In the intricate world of clinical procedures, where subtle variations in tissue color, texture, and vasculature hold the key to patient health, proper illumination is not a luxury—it’s a fundamental necessity. Yet, the quest for perfect light is often hampered by cluttered floors, awkward positioning, and inconsistent performance.
Enter the wall mounted examination light: a specialized, purpose-built solution that transcends the limitations of traditional mobile units. More than just a fixture, it is an integral component of an efficient, safe, and ergonomic clinical environment. This guide is designed to be your definitive resource. Whether you are a practitioner specifying equipment for a new operatory, a facility manager overseeing a clinic upgrade, or a procurement specialist evaluating options, we will provide the authoritative, experience-based knowledge you need to make an informed investment in patient care and workflow efficiency.
What is a Wall Mounted Examination Light?
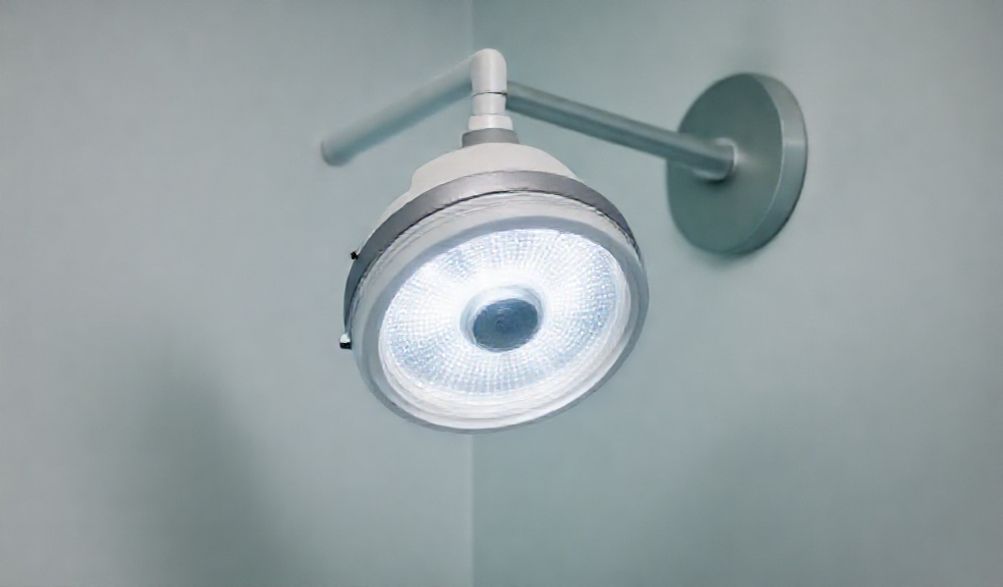
A wall mounted examination light is a medical-grade lighting system permanently affixed to a wall or structural column. Its core mission is to deliver intense, shadow-reduced, and cool illumination directly onto a procedural field, such as an exam chair, treatment table, or surgical site. Unlike a common room light, it is engineered to the exacting standards of clinical work, providing consistent, high-quality light that reveals true tissue characteristics without causing thermal discomfort to the patient or practitioner.
From my years consulting on clinical space design, the choice to go wall-mounted is often the first step in creating a intentionally streamlined workspace. It represents a move away from temporary solutions toward a permanent, reliable tool.
Core Components and How They Work
Understanding the anatomy of a wall mounted light demystifies its performance and helps in evaluating quality. A robust unit consists of four key subsystems:
- The Mounting Bracket & Arm Assembly: This is the foundation. A heavy-duty wall plate secures to the building’s structure. From it extends a series of articulated arms, typically two or three, connected by high-quality rotational joints (often featuring gas springs or friction controls). This multi-link design is the key to its utility, providing a wide range of motion.
- The Light Head: The business end of the system. In modern units, this houses an array of high-performance LED chips. Behind them sits a precisely engineered reflector or optical lens system designed to focus the light, minimize scatter, and critically, reduce shadows cast by the clinician’s head and hands. The best heads are sealed to prevent ingress of dust and fluids.
- The Control System: This can be located on the light head, on a panel along the arm, or via a remote footswitch. It allows the user to adjust intensity (dimmer) and, on advanced models, color temperature (CCT). Smooth, intuitive control is essential for maintaining sterility and workflow.
- The Power System: This includes the internal wiring running through the arms and a transformer that converts mains power to the appropriate voltage for the LED array, ensuring stable, flicker-free operation.
The magic is in the articulation. By moving the arms, the light head can be positioned precisely—extended out over a patient, lowered for a seated examination, or swung completely out of the way when not in use. This “reach and retreat” capability is what makes it so versatile.
Primary Use Cases and Clinical Environments
The wall mounted exam light is a workhorse across numerous settings:
- Medical Examination Rooms: In GP/Family Practice, ENT, Dermatology, and Ophthalmology clinics, it provides the perfect light for detailed physical exams, otoscopic/ophthalmoscopic procedures, and minor interventions like suturing or cryotherapy.
- Dental Operatories: Essential for illuminating the oral cavity. Dentists and hygienists rely on their intense, shadow-free light to diagnose caries, perform restorative work, and conduct periodontal procedures with precision.
- Veterinary Clinics: From routine pet exams to minor surgeries, these lights provide the consistent illumination needed in a dynamic environment where patient (animal) positioning can be challenging.
- Minor Procedure Suites: In outpatient surgery centers or emergency departments, they are ideal for laceration repair, incision and drainage, biopsies, and other procedures that require excellent visualization but not the full overhead array of a major OR light.
- First Aid & Treatment Rooms: In workplaces, schools, or sports facilities, a wall-mounted light ensures that first responders have reliable, professional-grade illumination for assessing and treating injuries.
Key Benefits of Choosing a Wall Mounted Design
The decision to install a wall-mounted light is driven by tangible benefits that solve everyday clinical problems, enhancing both the practice environment and the quality of care.
Maximizing Space and Improving Ergonomics
In a crowded exam room, every square foot counts. A wall mounted light eliminates the bulky floor stand or mobile base of a traditional light, instantly freeing up valuable floor space. This reduces clutter, minimizes tripping hazards for staff and patients, and makes cleaning faster and more thorough. Ergonomically, the easy, fluid adjustability means the practitioner can position the perfect light with a gentle touch, without straining, stretching, or wrestling with a wheeled unit. The light comes to the field of view, not the other way around.
Enhanced Stability and Consistent Performance
Have you ever nudged a mobile light during a procedure and spent valuable time repositioning it? A wall mounted fixture, once set, stays put. Its fixed anchor point provides unwavering stability, which is crucial during lengthy, focused procedures. There is no drift, no accidental bumps from passing staff, and no wobble. This reliability translates to consistent visual conditions from the first minute to the last, reducing eye strain and practitioner fatigue.
Streamlined Workflow and Infection Control
Efficiency is born from predictability. A wall mounted light is “always on station.” There’s no need to fetch it from another room, untangle a cord, or maneuver it around obstacles. It is instantly ready for use, streamlining patient turnover. From an infection control perspective, the design is superior. High-quality models feature seamless, sealed housings with minimal crevices where contaminants can hide. They are easily wiped down with hospital-grade disinfectants between patients, supporting stringent infection prevention protocols far more effectively than complex mobile bases with wheels and stems.
Critical Features to Consider Before You Buy
Selecting the right light requires looking beyond the brochure. Here is an authoritative breakdown of the specifications that truly matter.
Métriques de performance d'éclairage
This is where clinical efficacy is defined.
- Lux/Lumens & Adjustability: Le Lux measures light intensity at the surface (illuminance). For general examinations, 15,000 to 30,000 lux at the working distance is standard. For minor surgical procedures, 40,000 lux or more is recommended. Ensure the light can deliver this intensity and has a smooth, continuous dimmer—not just high/low switches—to tailor the light for every task and patient sensitivity.
- Indice de Rendu des Couleurs (IRC) : This is non-negotiable. CRI measures a light’s ability to reveal the true colors of objects compared to natural light. For accurate diagnosis of tissue health, inflammation, cyanosis, or jaundice, you need a CRI of 90 ou plus. A light with a low CRI can make healthy tissue look pathological and vice versa.
- Color Temperature (CCT): Measured in Kelvins (K), this describes how “warm” (yellowish, ~4000K) or “cool” (bluish, ~6000K) the light appears. Cooler light is often perceived as brighter and more alerting, while warmer light can be less harsh. The best modern lights offer adjustable CCT, allowing you to switch between, for example, 4500K for general exams and 5500K for surgery, mimicking daylight for optimal color discrimination.
Mechanical Design and Usability
The light must be a pleasure to use, day in and day out.
- Arm Reach and Articulation: Consider the “working envelope.” Measure the distance from your intended mount point to the center of your exam area. The light’s total reach must comfortably cover this, plus allow for positioning flexibility. Look for arms that offer a wide range of motion (multiple joints, rotation, tilt) and have a balanced feel—they should stay where you put them without sagging or requiring excessive force to move.
- Durability and Build Quality: This is an investment. Feel the weight and finish. High-quality aluminum or steel alloys, robust bearing mechanisms in the joints, and thick, medical-grade coatings are signs of a product built for a long clinical lifespan. Cheap plastics and loose, gritty joints are red flags.
- Ease of Cleaning and Maintenance: The design should support your cleaning protocols. Are seams sealed? Is the surface smooth and non-porous? Can the external optics be wiped without damage? A good supplier will provide a list of compatible disinfectants.
Compliance and Safety Standards
This builds the foundation of trust. Insist on products that comply with recognized international standards.
- IEC 60601-1 : The essential safety standard for medical electrical equipment. Compliance ensures protection against electric shock, mechanical hazards, and excessive radiation.
- Indice de Protection (IP) : e.g., IP44 or higher. This certifies the fixture’s resistance to dust and water splash, crucial for cleaning and use in humid environments like dental operatories.
- ISO 13485 : This indicates the manufacturer has a certified quality management system specific to medical devices, ensuring consistent production quality and traceability.
- Compatibilité électromagnétique (CEM) : Ensures the light does not interfere with other sensitive medical equipment in the room.
Always request and verify the product’s Declaration of Conformity and test certificates from the manufacturer.
Wall Mounted vs. Ceiling Mounted vs. Mobile Examination Lights
Each type has its ideal application. A balanced comparison helps match the tool to the task.
Situational Advantages of Each Type
- Wall Mounted: Le versatile all-rounder. Best for standard-sized examination rooms, dental operatories, and dedicated minor procedure rooms. It offers an excellent balance of performance, space-saving, and cost-effectiveness (both in unit price and installation complexity compared to ceiling mounts). It defines a specific “zone of examination.”
- Ceiling Mounted: Le solution for maximum clearance. Ideal for large operating rooms, major procedure suites, or any space where absolute floor freedom is required (e.g., for large mobile equipment like C-arms). They offer the largest coverage area and highest intensity but require significant structural planning, a dropped ceiling track, or a major structural mount, making them the most expensive to install.
- Mobile/Floor Stand: Le flexible supplement. Suitable for multi-purpose rooms, clinics on a very tight initial budget, or as an auxiliary light. Their primary advantage is portability. However, they consume floor space, are less stable, present a tripping hazard with cords, and are harder to keep clean. They often represent a higher long-term total cost due to maintenance and replacement.
Professional Installation and Maintenance Guidelines
Proper setup and care are what transform a quality product into a reliable, long-term asset.
Pre-Installation Planning: Location and Wiring
Careful planning prevents costly mistakes.
1. Wall Structure: Determine what’s behind the drywall. Mounting doit be into solid wood studs, concrete, or masonry using appropriate heavy-duty anchors. Mounting into drywall alone is unsafe and will fail.
2. Optimal Height: The standard mounting center is typically 150-170cm (5-5.5 feet) from the floor, but this depends on your exam table height and the light’s arm reach. Mock up the position with measurements before drilling.
3. Electrical Prep: Ensure a dedicated, properly grounded electrical outlet is within reach of the light’s power cord. The circuit should not be shared with other high-draw equipment.
4. Professional Installation: This is not a DIY project. I strongly recommend using a qualified electrician or a technician certified by the equipment supplier. They will ensure safe, secure mounting and correct electrical connection, preserving your warranty and, most importantly, ensuring patient and staff safety.
Routine Care and Calibration
A simple routine extends the light’s life and ensures consistent performance.
* Daily/After Each Patient: Power off the light. Wipe down all external surfaces, especially the light head and handles, with a soft cloth dampened with a manufacturer-approved mild disinfectant. Avoid abrasive cleaners or direct spraying onto seams.
* Monthly: Check the tension and smoothness of all arm joints. Listen for creaks or catches in movement. Inspect the power cord for any damage.
* Annuel : Consider a professional service check. This can verify that light output (lux) and color metrics (CRI, CCT) have not degraded beyond acceptable limits—a process akin to calibrating any other diagnostic instrument.
Foire Aux Questions (FAQ)
Q1: What is the typical lifespan of a high-quality LED wall mounted exam light?
A: Premium LED units are designed for extreme longevity. With proper care, the LED array itself can last 50,000 to 100,000 hours. In a typical clinical setting (8 hours a day, 5 days a week), this translates to 10-20 years of service, vastly outperforming old halogen systems that required frequent, costly bulb replacements.
Q2: Can I install it on any wall?
A: Absolutely not. The wall must be structurally sound to support both the static weight and the dynamic force of the extended arm. Installation into drywall or plaster without hitting a stud or using a proper structural backing plate is a serious safety hazard. Always follow the manufacturer’s load specifications and use a professional installer.
Q3: Are these lights suitable for major surgery?
A: While excellent for examinations, dental work, and minor surgical procedures, major abdominal or orthopedic surgery typically requires the vastly higher intensity (100,000+ lux), broader field coverage, and deep-cavity illumination of dedicated surgical ceiling lights. Always match the light’s specifications to its intended clinical purpose.
Q4: How do I clean the light head without damaging it?
A: First, always disconnect the power. Use a soft, lint-free cloth lightly dampened with a mild disinfectant solution recommended in the user manual (e.g., diluted isopropyl alcohol or a quaternary ammonium compound). Gently wipe the exterior housing and the protective glass/plastic lens. Avoid spraying cleaner directly onto the light, as liquid can seep into seams and damage electronics. Never use abrasive pads, scouring powders, or harsh solvents like acetone.
Conclusion
A wall mounted examination light is far more than a simple fixture; it is a strategic investment in clinical precision, practitioner ergonomics, and operational efficiency. By permanently integrating high-quality illumination into the workflow, it removes variables and creates a foundation for excellent patient care.
As you evaluate options, let this guide be your benchmark. Prioritize véritable performance clinique (IRC élevé >90, lux appropriés, CCT réglable) et conception robuste et centrée sur l'utilisateur plutôt que sur le prix seul. Les quelques dollars supplémentaires investis dans un produit de qualité, conforme, provenant d'un fournisseur réputé, généreront quotidiennement des dividendes en termes de fiabilité, de sécurité et de confiance diagnostique pour les années à venir. Utilisez ces informations pour poser des questions éclairées, exiger une documentation de conformité et vous associer à un fournisseur qui comprend le rôle essentiel que cet équipement joue dans votre pratique.
p>