
The Ultimate Guide to Examination Lights: Types, Uses, and How to Choose
Introduction
Imagine a seasoned physician leaning over a patient, meticulously palpating an abdomen. Or a nurse practitioner carefully inspecting a subtle rash. Now, imagine them doing it in dim, yellowed, or shadow-filled light. What crucial detail might be missed? What if a slight discoloration signaling early cyanosis, the precise border of a lesion, or the true hue of a healing wound was obscured? In the high-stakes world of medical diagnostics, the quality of illumination is not a mere convenience—it is a fundamental component of clinical accuracy and patient safety.
This guide is designed to demystify the critical yet often overlooked medical device: the смотровой светильник. Compiled from industry standards, clinical best practices, and manufacturer specifications, this resource aims to transform a complex procurement decision into a clear, actionable process. Whether you are a physician outfitting a new practice, a nurse manager upgrading an outpatient clinic, or a hospital procurement specialist, you likely arrived here with a need. That need falls into two categories: the informational (understanding the types and features of examination lights) and the commercial (determining which model to purchase).
This comprehensive guide will serve both intents. We will explore what sets a медицинский осветительный прибор? apart from ordinary lighting, break down the key technologies that power modern units, survey the common types and their specific applications, and provide a structured, step-by-step framework to select the perfect light for your clinical environment. Choosing the right light is not just about buying equipment; it’s about investing in diagnostic confidence.
What is an Examination Light? Core Function and Importance
Defining the Purpose: Beyond Simple Illumination
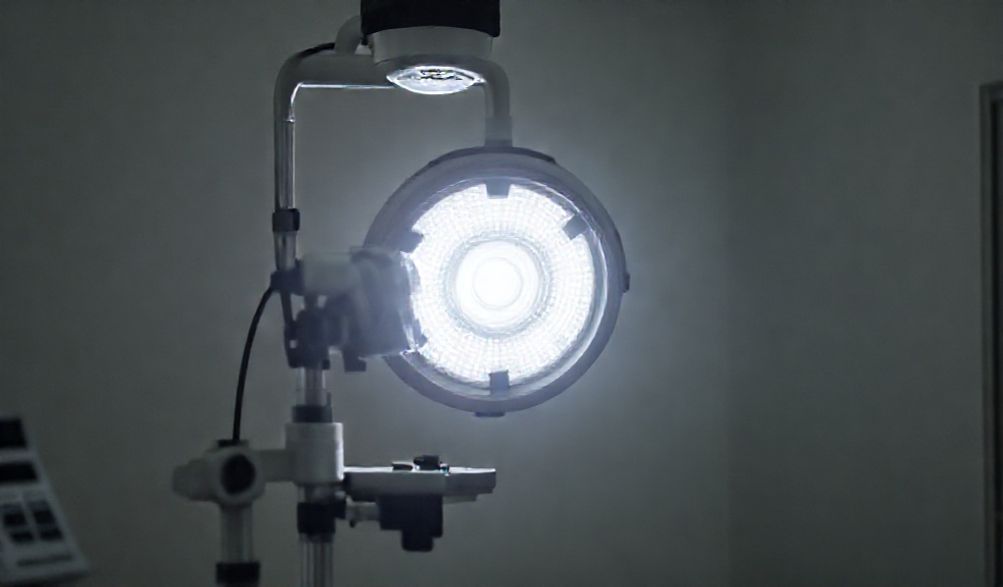
An examination light is not a glorified desk lamp. It is a specialized medical device engineered for a single, vital purpose: to provide optimal visualization of the patient’s anatomy during examination, diagnosis, and minor procedures. Its design addresses the specific challenges of clinical observation that general ambient room lighting fails to solve.
While overhead room lights illuminate the space, they often create glare on skin, cast shadows from the clinician’s own body, and lack the intensity and color fidelity needed for detailed assessment. An examination light, in contrast, delivers a controlled beam of high-quality light directly to the area of interest. Think of it as the difference between looking at a painting in a dimly lit hall versus examining it under a conservator’s focused, color-accurate lamp.
The Impact of Quality Lighting on Clinical Outcomes
The correlation between lighting quality and clinical outcomes is profound. Subpar lighting is a sensory barrier that can directly impact diagnostic accuracy.
- Color Accuracy: The ability to discern true tissue color is paramount. Is that skin slightly yellow (jaundice), blue (cyanosis), or pale (anemia)? Is a wound bed showing healthy granulation (red) or signs of infection (yellow/green)? Poor lighting with a low Color Rendering Index (CRI) can distort these subtle hues, leading to misjudgment.
- Shadow Reduction & Detail Revelation: Shadows can hide texture, depth, and borders. A good examination light is designed to minimize shadows, either through a large, diffuse light source or multiple LED arrays, revealing the contours of a swelling, the edges of a lesion, or the depth of a laceration.
- Clinician Comfort & Fatigue: Eye strain from squinting under inadequate or flickering light contributes to clinician fatigue, which can indirectly affect concentration and performance over long shifts.
In essence, a high-quality examination light is a tool for enhancing visual acuity, reducing diagnostic uncertainty, and promoting both patient safety and the clinician’s diagnostic confidence.
Key Features and Technologies of Modern Examination Lights
Understanding the specifications is key to making an informed choice. Here are the core technological and design aspects that define a modern examination light.
Light Source Technology: LED vs. Halogen
The heart of any light is its source. The medical field has undergone a significant shift from traditional halogen to Light Emitting Diode (LED) technology.
-
LED (The Modern Standard):
- Efficiency & Cool Operation: LEDs consume significantly less energy and convert most of it to light, not heat. This “cool” operation prevents patient discomfort during close-proximity exams and eliminates a burn risk.
- Longevity & Consistency: An LED module can last 30,000 to 50,000 hours, dwarfing the 1,000-2,000 hour lifespan of a halogen bulb. More importantly, LED color temperature and output remain consistent throughout its life.
- Instant On & Dimming: LEDs achieve full brightness instantly and typically offer smooth, flicker-free dimming.
-
Halogen (The Legacy Technology):
- Качество света: Halogens produce a warm, continuous spectrum of light that was once the gold standard for color rendering.
- Drawbacks: They are inefficient, generate intense heat (posing patient and clinician risk), have a short lifespan, and their color temperature shifts as they age and dim.
Verdict: For nearly all new purchases and upgrades, LED is the unequivocal recommendation due to its lower total cost of ownership, superior safety profile, and clinical performance.
Optical Performance Metrics
These are the numbers on the spec sheet that matter most.
- Индекс цветопередачи (CRI): Measured on a scale of 0-100, CRI indicates how accurately a light source reveals the true colors of objects compared to natural sunlight. For clinical work, a CRI of 90 or above is essential. A high CRI ensures that the subtle differences between shades of red, yellow, and blue in tissue and fluids are visible.
- Lux/Lumen Output & Adjustability: Lux measures light intensity at a surface (e.g., the exam point). A general exam light should offer adjustable output, often ranging from 3,000 to 10,000+ lux, allowing a clinician to dial in the perfect intensity for a routine skin check versus a detailed wound debridement.
- Color Temperature: Measured in Kelvins (K), this describes the “warmth” or “coolness” of white light. Warmer light (3000-4000K) is often considered soothing, while cooler light (5000-6000K) is perceived as brighter and more alerting, mimicking daylight. Many medical LEDs are in the 4000-5000K range, providing a neutral, clinical white.
Design and Ergonomics
How the light moves and survives in a clinical environment is as important as the light it emits.
- Mobility & Positioning: This is defined by the mounting system.
- Потолочное крепление: Offers the greatest freedom of movement, keeps floors clear, and is ideal for procedure rooms or bedsides where floor space is limited.
- Настенное крепление: A space-saving solution for smaller exam rooms.
- Floor-Stand: Provides ultimate portability, allowing a single light to be moved between rooms.
- Articulating Arms: Regardless of mount, multi-jointed arms with gas springs or counterbalances allow for easy, tool-free positioning that stays precisely where placed.
- Sterilization & Cleanability: The housing and handle must be made of seamless, non-porous materials (like medical-grade polymers or stainless steel) that can withstand frequent wiping with hospital-grade disinfectants without degrading.
Common Types of Examination Lights and Their Applications
Not all exams are the same, and neither are the lights designed for them.
General Examination Lights (Over-the-Bed / Procedure Lights)
These are the workhorses found in most exam rooms, emergency department bays, and at patient bedsides.
* Application: Routine physical exams, vital sign checks, IV insertion, basic wound care.
* Ключевые особенности: A broad, even field of illumination (often 12-18 inches in diameter), good intrinsic shadow reduction, and adjustable intensity. They prioritize versatility.
Specialty Examination Lights
- Gynecological (GYN) / Vaginal Examination Lights: These are specialized for the lithotomy position. They are often integrated directly into the examination table or mounted on a floor stand that tucks under the table. The light head is typically smaller and intensely focused, delivering high lux levels directly to the perineal area without illuminating the patient’s face.
- ENT Examination Lights: Designed for examinations of the ears, nose, and throat. They are frequently head-mounted (worn by the clinician like a headlamp) or on a very short, maneuverable arm attached to the exam chair. This provides hands-free, coaxial lighting that shines directly into canals and cavities.
- Dermatology & Wound Assessment Lights: The emphasis here is on extreme color fidelity (very high CRI) and often magnification. Some models combine a bright, neutral LED light with a 3x or 5x magnifying lens, allowing for incredibly detailed inspection of skin lesions, hair follicles, and wound margins.
Portable and Diagnostic Lights
- Penlights: The smallest member of the family. Used for checking pupil reactivity (PEARL), examining the oral cavity, or as a general pocket light. Look for ones with a focused spot and a broad flood setting.
- Трансиллюминаторы: These are highly specialized lights used to differentiate between cystic and solid masses or to visualize veins. They emit a bright, cool light that, when pressed against tissue (e.g., the sinuses or a baby’s scalp), causes fluid-filled structures to glow.
How to Choose the Right Examination Light: A Step-by-Step Guide
Follow this structured approach to narrow down your options and make a confident decision.
Step 1: Assess Your Primary Clinical Application
Start with the procedure. Match the most common tasks to the light type.
* General Physical Exams & Triage: A versatile General Examination Light (ceiling or wall-mounted).
* Women’s Health / Urology: A dedicated GYN Examination Light, ideally integrated with your exam table.
* Minor Procedures (Suturing, Incision & Drainage): A General or Procedure Light with high maximum lux (≥10,000) for deep cavity illumination.
* Detailed Tissue Assessment (Dermatology, Plastics, Wound Care): A High-CRI Specialty Light, potentially with magnification.
Step 2: Evaluate the Clinical Environment
The physical space dictates the practical form factor.
* Room Size & Layout: Low ceilings may preclude a large ceiling-mounted unit. A cramped room may benefit from a wall-mounted light to save floor space.
* Need for Mobility: Do you need one light to service multiple rooms? A floor-stand model is your answer.
* Power & Infrastructure: Consider outlet locations. Ceiling mounts require pre-run electrical conduits.
Step 3: Prioritize Technical Specifications
Create a minimum requirements checklist based on your application from Step 1.
* CRI: Must be ≥90.
* Light Source: LED.
* Minimum Lux: Determine your need (e.g., 5,000 lux for general exam, 15,000 for procedure).
* Color Temperature: 4000-5000K — безопасный клинический стандарт.
* Диаметр поля: 12-18 дюймов для общего использования.
Шаг 4: Учет эксплуатационных и бюджетных факторов
Смотрите дальше ценника.
* Общая стоимость владения (TCO): Включите энергопотребление (LED экономит значительно), затраты на замену ламп (незначительные для LED) и ожидаемые интервалы обслуживания.
* Гарантия и обслуживание: Надежная гарантия (5+ лет на LED-модули) свидетельствует о качестве. Уточните возможность обслуживания в вашем регионе.
* Соответствие стандартам: Убедитесь, что устройство имеет соответствующие сертификаты для медицинских изделий (например, FDA, CE, ISO 13485) для вашей локации.
Лучшие практики установки, обслуживания и безопасности
Отличный светильник при плохой установке или обслуживании становится источником риска.
Правильная установка для устойчивости и безопасности
- Профессиональная установка обязательна, особенно для потолочных моделей. Падение головы светильника представляет серьезную опасность. Установка должна обеспечивать надежное крепление и плавное движение всех штанг без провисания или смещения.
- Организация кабелей: Для напольных моделей используйте защитные рукава или кожухи, чтобы предотвратить риск споткнуться о шнуры питания.
Протокол регулярной очистки и дезинфекции
- Следуйте инструкциям производителя: Используйте только одобренные дезинфицирующие средства. Агрессивные химикаты могут вызвать помутнение линз или повредить покрытие.
- Концентрация на зонах частого контакта: Очищайте ручки, переключатели управления и корпус головы светильника после каждого пациента в соответствии с политикой инфекционного контроля вашего учреждения.
Плановые проверки работоспособности
- Ежегодная проверка: В рамках программы клинической инженерии проверяйте световой поток (люкс) и цветовую стабильность светильника в соответствии с его исходными характеристиками.
- Механический осмотр: Проверяйте все соединения, штанги и пружины на износ, плавность работы и устойчивость.
Раздел Часто задаваемых вопросов (ЧАВО)
В1: Каков идеальный индекс цветопередачи (CRI) для медицинского осветительного прибора?
О: CRI 90 и выше — рекомендуемый минимум для точной клинической оценки. Это обеспечивает правильную цветопередачу кожи, тканей, слизистых оболочек и жидкостей.
В2: Лучше ли LED-осветители для обследования, чем галогенные?
О: Практически по всем клиническим и эксплуатационным аспектам — да. LED-светильники более энергоэффективны, выделяют минимум тепла (повышая комфорт и безопасность пациента), имеют срок службы в 15-50 раз дольше и обеспечивают стабильный, бесшумный свет с отличной цветопередачей. Они представляют собой современный стандарт.
В3: Какая интенсивность света (люкс) необходима для общего смотрового кабинета?
О: Требования различаются, но качественный универсальный осветитель для обследования должен предлагать регулируемую интенсивность, обычно в диапазоне от 3 000 до 10 000 люкс и более на стандартном рабочем расстоянии (например, 1 метр). Это обеспечивает гибкость — от рутинного осмотра до более детальных процедур.
В4: Можно ли использовать обычную напольную лампу или промышленный светильник в качестве осветителя для обследования?
О: Нет. Бытовые лампы не обладают критически важными характеристиками: высоким CRI, контролируемым и интенсивным лучом, медицинским управлением тенью и стерилизуемыми корпусами, необходимыми для безопасной и точной клинической работы. Они не предназначены для соответствия стандартам медицинских изделий в области инфекционного контроля или оптических характеристик.
В5: Как часто следует обслуживать осветительный прибор для обследования?
О: Помимо ежедневной очистки, следует проводить официальную проверку работоспособности и безопасности не реже одного раза в год, в соответствии с рекомендованным графиком производителя и политикой обслуживания медицинского оборудования вашего учреждения. Эта проверка должна включать механическую устойчивость, электробезопасность и проверку светового потока.
Заключение
Выбор осветителя для обследования — это решение, которое влияет на ежедневную клиническую практику. Оно затрагивает точность диагностики, эргономику работы врача, операционную эффективность и, в конечном счете, качество помощи пациентам. Это гораздо больше, чем простая закупка — это инвестиция в фундаментальный медицинский инструмент.
Продвигаясь вперед, используйте предоставленное пошаговое руководство для систематической оценки ваших потребностей. Расставьте приоритеты в технических характеристиках, таких как высокий CRI и LED-технология, и никогда не недооценивайте важность эргономики и стерилизуемой конструкции. Всегда приобретайте оборудование у надежных производителей, соблюдающих строгие нормы для медицинских изделий.
Мы рекомендуем провести аудит вашего текущего освещения, определить контрольный список спецификаций, а затем обратиться к проверенным поставщикам медицинского оборудования или специалистам по освещению. Делая осознанный выбор, вы гарантируете, что каждая деталь будет четко видна, поддерживая высокий уровень помощи, к которому вы стремитесь.
p>